How to Upload Beats on Airbit
Uploading your beats is the first essential step to begin selling on Airbit. We support four uploading options: New, Replace, Tagged, and Trackouts. The “New” option is to upload a WAV or MP3 file of a new, untagged beat, which will be sent to the customer after an order completion. “Replace” is to replace a beat’s WAV or MP3 file. “Tagged” allows you to upload a tagged (watermarked) version of your beat for visitors to stream on your Airbit store. “Trackouts” allows you to upload stems of your beats.
Uploading Beats
All beat uploading is done from Airbit Dashboard > Music & Media > Beats > Upload.
To start uploading a new beat, click New
Drop files inside the dashed box, or click inside the box and select your beats from your computer. You have the option here to upload either an MP3 or a WAV file. Although it’s completely up to you on which type of file to use, it’s generally recommended to upload a WAV file due to higher quality. Your WAV file will automatically convert to 320kbps MP3, providing you with the best quality possible for your beats.

After the file has been uploaded, a panel will appear for the beat. In it, you can add your beat name, tempo, genre, up to 3 moods, and 10 tags. Tags & Moods are important to helping customers find your beats because they increase search visibility in the marketplace. For example, a customer may search for a “#drake type beat” or a beat with an “aggressive” mood. If your beat fits either of these search criterias, there’s a higher chance for it to show up in their search results than if you were to add no tags or moods. As a result, tags and moods should be added to all your uploads and they should accurately describe the sound/feel of your beat.
When uploading your beats, you have the option to set your beat to public or private. Setting to private is a great way to make certain beats available for a specific group of customers - whether it's email subscribers, existing customers, new customers, etc. If set to private, these beats will not be displayed in your store, but they can still be purchased if you share them. Private beats can be added to a playlist and shared, or shared individually. Only the people you share private beats with will be able to see and purchase them.

You can read more about private beats & playlists in our support guide here.
You are also able to schedule beats to be released at a specific date and time. In order to do this, follow these steps:
On the beat’s information page, the beat license prices can be set and the beat can be scheduled for release on a certain date.
1. Upload your beat(s) in Dashboard > Music & Media > Beats > Upload
2. Scroll down to the bottom, and click the calendar or enter the date & time manually
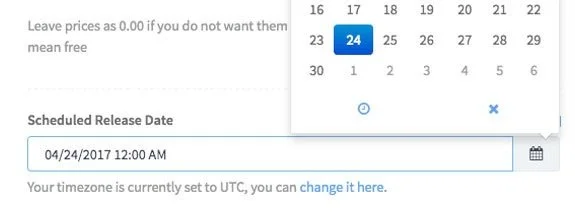
3. Save your beat and it will now be uploaded into the server, but unavailable to the public until your set date
After saving the new beat, a tagged version will automatically be generated for your beat. Autotag will automatically tag your beats with the Airbit voicetag. You also have the option to use your custom voicetag (more information below on uploading a custom voicetag).
Voicetags
A voicetag is a personalized audio snippet that is used to tag (watermark) your beats to protect them against unauthorized use. A voicetag most commonly consists of someone repeating the producer’s name every 20-30 seconds, but you can personalize your voicetag however you see fit.
Voicetags are uploaded in Airbit Dashboard > Music & Media > Voicetag. Once added, all new beats will have a tagged version automatically generated by our system.
Our system will loop your voicetag with your untagged MP3 to create a new tagged MP3 which is used for streaming on your stores. If you don’t upload a custom voicetag, the default Airbit voicetag will be automatically added to your beats.
Here are a few pointers on making a successful voicetag;
The voicetag is looped over the beat and there is no time delay between loops. So when making a voicetag, leave about 20-30 seconds of silent audio after or before the actual tag.
The voicetag must be in MP3 format.
You may need to experiment with the volume of the voicetag until it sounds mixed in with your beats.
To add a voicetag to your beats, follow these steps:
1. Login to your account and go to Dashboard > Music & Media > Voicetag
2. Drop your voicetag into the dashed box or click inside the box to choose your file
3. Once the voicetag has been uploaded, you will be able to preview it by clicking the play button. You can also delete the voicetag by clicking “Delete”
4. You can then use autotag to create tagged versions of all your beats with this tag
To tag your beats using autotag, head to Music & Media > Beats and select your beats using the checkbox. Then select 'Autotag' from the tabs above.
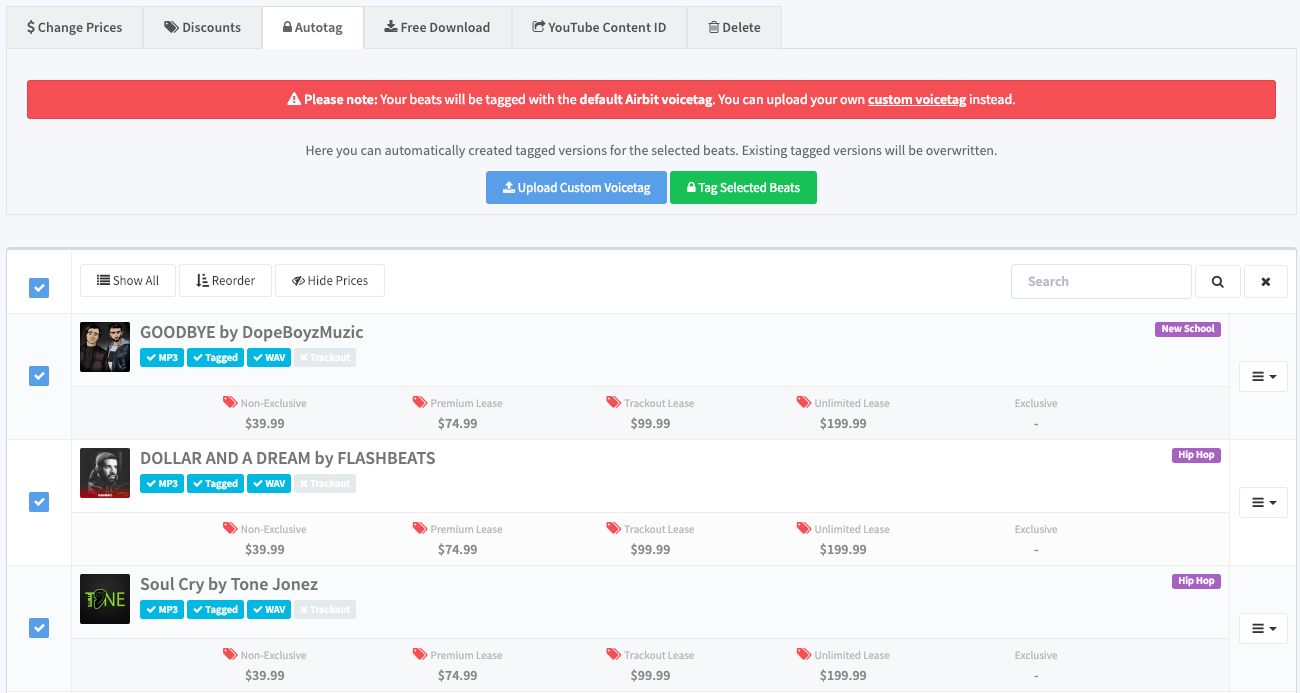
Remember to click 'Show All' before selecting your beats if you have more than 20 and want to tag them all.
If you prefer to mix your tag into your own beats and upload them manually, then you can still do that by following the instructions below:
To manually upload tagged beats, head over to Dashboard > Music & Media > Beats > Upload and click “Tagged”. You can only upload MP3s here.
Drop your tagged mp3 inside the dashed box or click inside the box and select a file.
Once the files have been uploaded, select the linked beat for each file from the drop down menu and click “Save”.
Click here for more info on how the tagged beat can be used to provide a mastered version for streaming and an unmastered version for the customers.
The last upload option is “Trackouts” - available to Gold & Platinum members only - which are the individual tracks (or stems) for each instrument in your project. You can provide these to your customers so they have more freedom with the mix when adding their vocals. Trackouts must be provided in a zip folder - you'll want to bounce/export all of your trackouts from your DAW and compress them into a zip folder. You need to upload the MP3 or WAV file of a beat before uploading its trackouts because trackouts must be linked to an existing beat when they are uploaded.
Trackouts are uploaded through Airbit Dashboard > Music & Media > Beats > Upload > Trackout
Drop your zip folder into the dashed box, or click to select a file.
Once uploaded, you will be prompted to link it to the beat.

You can also provide trackouts using a 3rd party link such as Dropbox, Google Drive, etc.
To do this:
1. Head to Dashboard > Music & Media > Beats and click the name of the beat.
2. Scroll down and enter your link in the Trackouts field. You can also add a password if you want, but this is not mandatory. Passwords will be delivered automatically to the customer.

3. Save the changes and you're done!
If you want to replace your existing beat with an updated version, use Upload > Replace.
Drop your files into the uploader, or click inside the dashed box and select your files.
Once your files have uploaded, you will be able to choose which beats you want to link the files to.
Select the relevant beat for each file and click “Save”.
Please note, replacing a WAV file does not replace the MP3 and tagged beat file. Therefore, you need to replace the WAV & MP3 files and run autotag to generate a new tagged beat file for your updated files.
Share a beat
We provide the ability to post your beats on your social media pages such as: Facebook, Twitter, Tumblr, Pinterest and Share via email. To share a beat, you can choose to share it to Facebook and Twitter from the beat information page (on the upload process via the checkbox) and from Airbit Dashboard > Music & Media > Beats. Next to each beat, there is a drop-down menu where you can select 'Share'. This will give you an embed code and a URL.
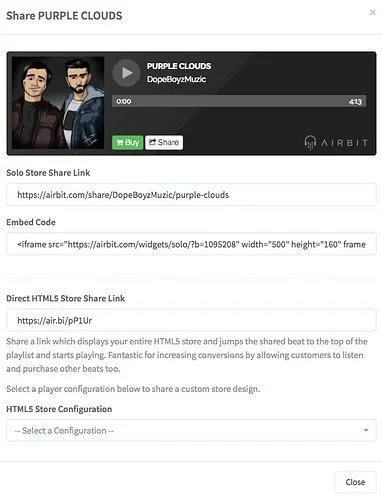
You can also select a store configuration to send people to, using the Direct HTML5 Store Share Link. This will send customers to your full store with the chosen beat playing at the top of the list.
You can also share a beat directly from your store by clicking 'Share' below the beat name. This will give you a selection of platforms to share your beat on. All you have to do is click one or copy and paste the link. This will also take people to your store with the beat playing at the top of the list.
In the upload process, submitting your beats to the Youtube Content ID program is also possible if you are already approved to join Youtube Content ID by our Content ID team. This facilitates the submission process so that you can upload your new beat, fill in the beat information, schedule your beat, and submit the beat to Youtube Content ID all in one page.
Content ID allows you to monetize your music on YouTube - click here for more information on how Content ID works.